How to Install Windows Xp Using Flash Drive
Here's how to create a bootable Windows SD card or USB flash drive. This is perfect for installing windows on a Netbook or Tablet PC.
Update: Windows 7 is no longer supported by Microsoft. Check out our article on how to create a bootable Windows 10 drive.
If you're working with a netbook or a tablet computer, you likely won't have an included DVD-ROM drive. Normally this is fantastic! It makes your overall device lighter, and less expensive. But, if you need to install or reformat Windows, then you run into some problems rather quickly. No DVD drive means you can't just burn a copy of Windows and throw it in there. Fortunately, most netbooks have an SD Card slot, and all of them support USB Pen Drives. Let's use that to our advantage and get Windows running.
What you need to do this:
- A minimum of an8GB* removable storage disk. This storage can be an SD card or a USB Flash Drive.
- A computer that is already running Windows.
- A Windows 7, Vista, or XP installation disk, or .iso file equivalent.
Although you only need 8GB, just grab a 32GB or 64GB from Amazon. As of 2017, it's probably more expensive to buy a smaller drive vs. a 64GB or larger. Also, don't forget to verify the motherboard you're installing Windows on supports booting from a USB / removable storage drive. This is fairly common now but if you're trying to install Windows on an older machine, something to think about if you run into issues.
Step 1
Alright, so you have your SD Card or a USB Pen Drive (some people call either of these flash drives.) Keep in mind that if you go the SD Card route, make sure your computer has an SD Card reader. The good news, they are cheap on Amazon so not a big deal if you need to order one real quickly.
Once you have procured yourself one of these, plug it into your computer. If you have anything valuable saved on your portable storage, back up any data you have saved on your SD/USB before we get started. In the steps that follow we'll be formatting and completely cleaning it out in the process of turning it into a windows boot disk.
*Oh, before I forget, agreat thing about USB Flash Drives, I suppose a 3GB drive would work, but as far as I know, that is a very unusual size. And besides, once you are done installing you can use the 4GB drive for ReadyBoost to improve your system performance.

Step 2
Go to the Start menu and type cmd in the search box to open up the command prompt.

In this tutorial we'll run into a lot of command-line, so to keep it easy I'll just list the command for each step. You'll need to press Enter after each command is typed out.
First, we need to open diskpart, which is a cmd-line program built-in to Windows.
Type: Diskpart

Step 3
A new window should appear with the system32\diskpart.exe in the title bar.
Type: list disk
Some disks should appear in a small matrix (chart.) Look for the one that matches the size of your SD Card/USB drive. It might not be an exact match since actual usable disk space is about 5% less than what is advertised. For the next command, you need to enter the number that corresponds to that drive.
Type: select disk 2

Step 4
Now that the disk is selected, we can start cleaning it up and getting it ready. These commands should be the same for everyone, so just enter them one after the other.
Type: clean Type: create partition primary Type: select partition 1 Type: active Type: format fs=fat32


Step 5
Formatting will take a couple of minutes, so now is a good time to grab a snack. ;)
Once it is done, we'll assign a drive letter to your newly formatted removable storage disk.*
Type: assign letter=y Type: exit
*You don't have to use the letter "y" but since that is likely not taken we'll use it for this tutorial to keep things simple.

Step 6
If you have a Windows 7 installation DVD, insert it into your DVD drive. If instead, you have an installation .ISO, then mount it on your computer using a virtual disk drive.

Once your disk is inserted, Click the Start Menu and then click Computer. A window should pop up listing all of your hard drives and removable storage. Look for your DVD drive and make a note of what letter is assigned to it. If you are using a virtual drive, it might be called the BD-ROM drive instead of a DVD. In my case, the DVD drive is assigned the letter "e," so that is what I'll be using in the next step.


Step 7
Now, all we have to do is copy the files from the installation disk to the sd card. In the example below, e:\ is my DVD drive and y:\ is my SD card.
Type: xcopy e:\* y:\ /s /e /f
This process might take a while since you are transferring a little over 2GB worth of files.

Done!
After the files ultimately transfer, you are done! You now have yourself a Windows installation portable drive.
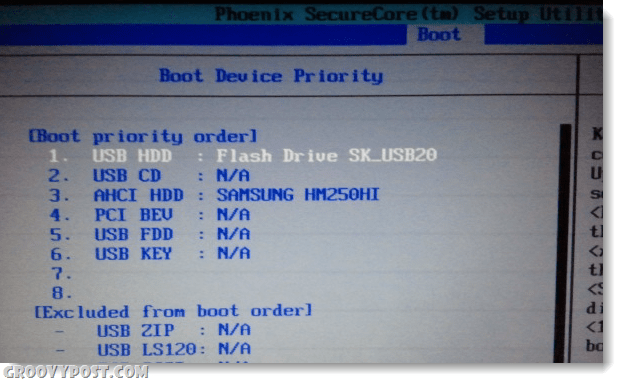
Now for the computer that you want to install Windows on using this, all you need to do is restart the computer and spam-press the F2 key while it is booting up; or whatever the setup key is, but F2 is the standard for many systems. Pushing the F2 key should load up the system Bios. Here you have to go into the Boot Device Priority section and change the USB/SD card to #1 on the priority list. Once this is set, your computer should treat your SD/USB just like a Windows 7 Installation DVD.
![]()
How to Install Windows Xp Using Flash Drive
Source: https://www.groovypost.com/howto/howto/create-a-windows-bootable-install-sd-card-or-usb-flash-drive/